"If the divine creator has taken pains to give us delicious and exquisite things to eat, the least we can do is prepare them well and serve them with ceremony."
- Fernand Point

What's cooking?

Monday, October 24, 2011

Cyn's Brown Sugar BBQ Cilantro Chili

Technically Fall is here although in Arizona it's still in the 90's.  Today however it was cloudy and that gave me the feeling for comfort food.  What better comfort food than a delicious bowl of chili!  Here's my newly made recipe for Cyn's Brown Sugar BBQ Cilantro Chili. 

Now I have to say that I searched the Internet for a good recipe for "homemade" chili and every recipe took about 45 minutes and called for "cans" of beans.  Cans?  That's not homemade to me.  I even checked the Food Network site but theirs were canned too.  So, I was left to my own ideas and here's what I came up with:

Ingredients:

Red kidney beans               1 bag

Pinto Beans                        1 bag
White Northern Beans        1 bag
Brown Sugar                       2 cups
Chili Powder                       1 packet
Cumin                                 1 tblspn
Garlic                                  1 cloves crushed
Ground Beef                        2 lbs
Onion powder                      2 tblspns
Salt and pepper                    1 tblspn
Sweet Baby Ray's BBQ       1 cup
Tomato paste                       1 can
Cilantro                                1 bunch (1 cup chopped)
Shredded Cheddar Cheese   1 bag
Sour Cream - Optional

Instructions:
First, since the beans are dried you'll need to soak them.  A quick-soak is best.  To do this you'll need a large stock pot.  You'll need 8 cups of water per every 1 lb bag of beans.  I used 24 cups with 3- 1 lb bags. Bring the water to a rapid boil and boil the beans for 2 minutes at a rapid boil.  Then remove them from the heat and let them sit covered for 1 hour. 
After that, drain and rinse them with cold water.

Return the beans to the pot and add water so that the beans are completely covered - about 7 cups. Add spices as well. 
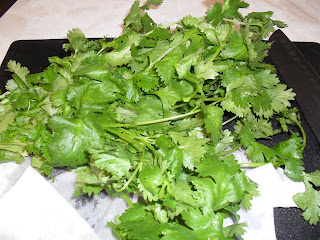
Let the beans cook on medium-high heat for 1 1/2 hours.  Meanwhile, rinse, pat-dry with a paper towel, and de-stem the cilantro. 

Chop it up and seal in either a baggie or sealed container and return to fridge until ready to use.

At this point, cook and lightly season the ground beef.  Drain all fat and oil from it.  And add it to the beans along with the cilantro, the brown sugar, tomato paste, chili packet, and the BBQ sauce.  Turn heat down to low and let simmer another 20 minutes.  

Check the consistency of the liquid.  If it's a little thin or runny, add about 1 tablespoon of flour or cornstarch to about 2 tablespoons of COLD water. 

Mix well, bring beans to a boil and add the flour and water to thicken the chili.  Turn heat back to low and cook about 5 more minutes, then turn heat off but leave pot on the burner.
 

 I cooked up some Jiffy Cornbread.  Feel free to serve with YOUR favorite addition (crackers, bread, etc.).
Fresh out of the oven...

It came out FANTASTIC!!  The beans were firm but tender, full of a sweet, tangy flavor. 

Serve up and garnish as you choose. I sprinkled the shredded cheddar cheese, added a dollop of sour cream, and finished it up with more cilantro (although the one below was for my husband and he didn't want the extra cilantro). 
I served mine with buttered cornbread.  It was EXACTLY what I was hoping for.  The whole family loved it and the best part is that I'll have left overs for tomorrow and I had enough to freeze and use another time.  Enjoy!!!

Full Recipe:
Red kidney beans 1 bag ( 1 lb)
Pinto Beans 1 bag
White Northern Beans 1 bag
Brown Sugar 2 cups
Chili Powder 1 packet
Cumin 1 tblspn
Garlic 1 cloves crushed
Ground Beef 2 lbs
Onion powder 2 tblspns
Salt and pepper 1 tblspn
Sweet Baby Ray's BBQ 1 cup
Tomato paste 1 can
Cilantro 1 bunch (1 cup chopped)
Shredded Cheddar Cheese 1 bag
Sour Cream - Optional

Instructions:
Beans:

Using a large stock pot- quick soak beans by adding 8 cups of hot water per bag of beans. Bring beans to a rapid boil and boil for 2 minutes. Remove from heat and let soak for 1 hour.

Drain and rinse beans after the hour. Return to the stockpot and add the "spices" to the beans along with 6 1/2 - 7 cups of water. Place on medium to medium-high heat and cook for 1 1/2 - 2 hrs.

Meanwhile, rinse and de-stem the cilantro and chop it up. 1 bunch should equal 1 cup chopped. Put in baggie or sealed container and store in refrigerator until ready to use.

After 1 1/2 hours, cook ground beef. Taste a bean to make sure it's getting soft turn heat to med. Add tomato paste to beans. Then add in cooked ground beef and brown sugar. Cook 15 mins.

Add cilantro and finish cooking another 10 mins on low-med. heat.

If chili is too runny, add mixture of flour or cornstarch (about 2 tablespoons) with 3 tblspns cold water. Bring chili to a BOIL and add the mixture. Stir it in, then immediately lower the heat to low. This will thicken the chili.  Top with shredded cheddar cheese and serve with your favorite cornbread.

Friday, July 1, 2011

Three Easy Dishes...

Lately I've been inspired by Asian dishes. So I gathered some basic ingredients and was able to make three savory dishes for my family. I started with angel hair cabbage and mixed it with shredded carrots and bean sprouts. I then used the only meat I had available which was ground beef. I put the shredded mix in a bowl, sprinkled it with onion powder and a few drops of soy sauce. Then I cooked the ground beef in a pan and seasoned it with onion powder, garlic, celery salt, salt, pepper, and some cajun seasoning. I then took egg roll wrappers and placed them on a cutting board in a diamond shape. I had a bowl of warm water standing by, and had a cookie sheet which had already been sprayed with Pam.


Next, I horizontally placed some of the shredded mix and then added some of the ground beef, (chicken or pork sausage works well too). I then dip my fingers in the warm water and wet the corners of the egg roll wrapper.


Then I proceed to fold and roll the egg roll starting with the corner closest to me, then the sides, and finally rolling it to the last corner.


The end result is a neatly rolled egg roll with an envelope roll.


I always egg wash them. The egg wash not only gives them a nice shiny finish, it helps them to get golden. If you do not egg wash them, they will look white and floury, which looks uncooked even though they are fully cooked.


Bake for 10 minutes at 350 degrees, then take them out, flip them over, egg wash the other side and back in the oven for another 5 minutes. Perfectly crispy.


I also use the same mixture and add a bit of mozzarella cheese. This time I use wonton wrappers. Same process except I don't roll them, rather I fold them in half and pinch the sides. Then I fry them. (I prefer to bake than fry but these fry up quickly and easily). Fry until golden brown, flip them and brown the other side and they are done.


These are super when dipped in soy sauce or sweet/sour sauce!!!


Lastly, I steamed a head of cabbage and peeled the leaves off. I used the same mixture but added rice and various other spices. I then removed the pre-steam cabbage leaves and filled them with the rice, beef, veggie mixture and rolled them for stuffed cabbage. I placed them in a glass baking dish sprayed with Pam and covered them with extra cabbage leaves. This helps them to steam without letting them burn. After baking for 20 minutes at 350 degrees, I took them out, covered them in a Vodka sauce and returned them to the oven for another 15 minutes. Delicious!!! And soooo easy!!! Three different delicious dishes from some very simple ingredients. The taste is clean, fresh, and for the most part...healthy. ;) Enjoy!

Wednesday, June 29, 2011

The Perfect Summertime "Go-to"!

Well, it's been quite a few months since I've blogged but I am back. The good thing is that I am back with some delicious meal ideas. My latest love is homemade egg rolls!! These are absolutely wonderful!!! They are BAKED which is a huge plus for those concerned about...well...their arteries. :) And they are healthy, easy, freeze beautifully, and so tasty.


I purchase 2-3 packages of egg roll wrappers. These are refrigerated (not frozen) so you can find them either in the section of your grocery store where butter and cheese and tofu are kept, or you'll find them in the produce section, again near the tofu. These however are NOT tofu. There are usually 24 to a pack.

What you'll need:


2-3 packages of egg roll wrappers

4-6 cups of shredded cabbage and carrots

4-6 good sized boneless chicken breasts

4-6 stalks of celery (julienned)

soy sauce

onion powder

salt *(unless using Badia which has salt in it.)
pepper

chili powder/flakes *(optional)

Badia Sazon spices (for the chicken)

1 egg (fork beaten)

small dish of warm water

Start by cutting off all fat from the chicken. Fill up a pot with enough HOT water to boil the chicken. Season the water with Badia seasoning, onion powder, and pepper to taste. (Badia has enough salt so you don't need to add additional salt.) Due to the fact that I always taste my water to make sure the seasoning is just right, I don't add the chicken until after it's seasoned.

Then add chicken and bring to a boil for about 10 minutes to ensure the chicken is fully cooked.

Meanwhile, shred cabbage and julienne carrots/celery, and season with some onion powder. Use some chili flakes or powder if you like them a little spicy.

Once chicken is boiled, using a fork, shred the chicken. Once it's sufficiently shredded, mix it with the cabbage/carrot/celery mix. Add 2-3 tablespoons of soy sauce and mix well.

Then open egg roll package. Take a wrapper and place it on a cutting board so it's shaped like a diamond, so that the corners are facing north, south, east, and west. Horizontally, lay a line of the mixture on the wrapper making sure that about 1/4 inch remains between the mixture and the wrapper's edge. Dipping your finger or the back of a spoon in warm water, dampen the corners of the egg roll wrapper and proceed to fold. First fold the corner closest to you, over the mixture, then fold the sides in, then roll it until the final corner is reached. The water will act like glue to seal it.

Lay them on a Pam'd (spray with Pam) cookie sheet and then using a brush, give them an egg wash glaze. This will give them a gorgeous tan color. Without the egg glaze, they will stay white and look uncooked even though they will be cooked.

Bake for 10 minutes at 325. Then flip them over, egg wash the other side, and bake for 5 more minutes.

They will be golden brown, crispy, and taste better than those you get at your favorite Chinese restaurant. Once they are cooled...you may freeze them in a good quality freezer bag. They freeze and reheat in the microwave or oven BEAUTIFULLY!!!! These have been quick and easy dinners for us a many occasions!!

They can make about 4 dozen, so stock up on freezer bags, or share with friends. You'll love them and find them the perfect summer go-to!!

Potstickers are next. Stay tuned...until then...


Enjoy!!

Thursday, April 7, 2011

Shiratakes - The Miracle Noodles!

Well it's been a while since I've blogged on here, but for now I'm back. Today I started back on HCG and I am adding a few things to my diet that will not only help satisfy me, but will not adversely affect the diet. One such item is Shiratake Noodles. The are dubbed as the "miracle noodle" because they are zero calories, gluten-free, soy-free, fat-free, sugar-free, super high in fiber and overall great for you! They come in a bag as shown above and are in a brine-like liquid. It has a fish base and will smell "fishy" when you open the bag.
You must rinse them thoroughly for 2-3 minutes in cold water. Once you no longer smell the "fishy" smell on the noodles, they are rinsed enough. The noodles do not have to be cooked as they are ready to eat once you rinse them. I chose to prepare them.
First of all, you want to pat out as much water as you can from them. This is best done using a paper towel and blotting them repeatedly.
Once you blot out as much water as possible, you can add oil, butter, or if you are doing HCG - you can add coconut oil (just a tad) since that is the only oil allowed while on the diet. I then added a bit of garlic, onion powder, salt, pepper, a little black bean garlic paste, and some chili paste. You can add any spices or sauces you enjoy. They would be fantastic in a chicken or beef stir-fry, a soup, or even alone (as I ate them).
The taste is similar to ramen noodles except much, much lighter, but just as filling! Delicious!!! And they are about $1.49 for 10 oz which is very affordable! Love these!!! They are my new staple food!!! I suggest you give them a try if possible. I found mine at my local Asian foods market store. Enjoy!! Eat up! =)

Thursday, February 10, 2011

Pleasantly Surprised!

Well for those of you that do not read my regular blog: The Life of Cyn at http://cyngnaztus@blogspot.com, I'll take a moment to fill you in on some specifics. Four days ago I started the HCG diet and in 3 days lost 11.5 pounds! I think it's safe to say that we've all heard lots of comments about it. Some say they starve. Others say it's not healthy to only have 500 calories per day. I'm here to say that as of yet I have not felt hungry at all! I have been totally satisfied however I will say that the key to this is squashing the "mental" game that our minds will undoubtedly play on us.

I don't have breakfast usually other than coffee on this diet and my mind tells me that in the morning I should be eating toast or oatmeal or something of that nature. Truth is, I haven't been hungry at all during breakfast so I've chosen to save my "breakfast food" for a mid-morning snack. Ultimately I get 2 proteins, 2 vegetables, 2 fruits, and 2 crackers each day. And THAT'S all I get! I have a list to choose from which is pretty specific. Unlimited coffee (no creamer), tea, broth, or water. So I decided to take a picture and share what I ate today, sharing pictures of dinner so you can all see that it doesn't have to be bland and boring.

Breakfast was Starbuck's Pike Place coffee; black w/Stevia. Mid-morning snack was 1 apple. Then for lunch I had 100g (approximately 3.5 ounces of boneless/skinless chicken breast (all fat trimmed off) and 1 piece of melba toast (the second of which is shown below) with spinach.

I did not have an afternoon snack, rather I wanted to wait for dinner. I took another 100g of boneless/skinless chicken breast and seasoned it generously with salt, pepper, onion powder, garlic powder, cajun spices (for some heat), dried cilantro leaves, and celery salt. I made a broth earlier in the day which consisted of 3 cups of boiled water and the spices mentioned above. I spooned some of the broth into a cast iron grill/skillet put in the asparagus which I seasoned with cajun seasonings, pepper, and kosher salt, and placed the chicken breast in the middle. I baked it for 30 minutes at 350 degrees. It came out delicious and very moist! I also had my second daily piece of melba toast,
and my second fruit which I chose an orange! It is filling, SO tasty, and couldn't be easier to make. Do I feel deprived? Nope! Am I hungry? Never (so far)! Can I keep this up? Yes I can! Would I love to snuggle up to a big ol' bag of Lay's chip? You betcha! But I won't because the truth is I have great energy, feel good, and let me tell you...there's NOTHING as satisfying as seeing the number on that scale get lower and lower! I am thrilled I tried this and hope to be blogging about my progress in days and weeks to come. Do I miss the junk food? Sometimes, but nothing tastes as good as losing weight feels. I was skeptical at first but I'm beginning to believe. Regardless I am genuinely and quite pleasantly surprised. ;D

Wednesday, February 2, 2011

The Old "Go-To"!

Okay, so truth be told, tonight's dinner wasn't homemade (by me anyway), wasn't the healthiest choice (although I believe it does contain food from the major food groups), and it isn't the norm, but when you either don't have time, or the desire to muster up the "Paula Deen" inside; pizza is a great "go-to"!

It's inexpensive, tasty, everyone loves it, and best of all; clean up is a cinch!!! So, while I try very hard to stay away from the easy, craptacular dinners, every now and then I welcome it!! And for the record, it sure was tasty!!! So when you find yourself in line for the "ready and waiting for you hot pizza", have at it! Indulge and enjoy!!! Afterall, they're there to make our lives easier aren't they? ;D

Monday, January 31, 2011

Dinner Is Served...again!

Well while it's true that I haven't blogged about meals in a really long time, I have still continued making tasty meals for my family. So I have decided to resume my food blog because we've had some really yummy meals that are incredibly easy to make and easy, delicious meals are always good to share with others. I've also gotten into to "couponing". Yep, it's almost a game and I absolutely love shopping with coupons and seeing exactly what dollar amount I can save! So I'll share those tips too and you can use them if you so choose.

Not sure what's for dinner tonight, but my darling husband made a wonderful Panko-crusted chicken last night so I'm thinking we may do left-overs. We'll see. Stay-tuned for tasty meal ideas, and if you have some of your own, please share at will. Happy eating!